By Lindsey Welch
Over the summer I was selected with seven other high school students to participate in a REM summer research project. Over the course of six weeks Jeeeun Kim and Abigale Stangl mentored a fellow high school student and I at CU Boulder. Our goal was to 3D print two accurate textures to incorporate into tactile picture books. We decided to focus two textures: sand and fish scales because we wanted to go with an ocean theme. We began our project by experimenting with CraftML.io, a web-based semantic 3D modeling application that was in the process of being designed by the Sikuli Lab. While this application was interesting because it combines 3D modeling with code like that used in HTML, we had a limited amount of time to work on the project and needed to work in a 3D modeling program that we were more familiar with. We decided to use TinkerCad to 3D model our designs.
Our first goal was to create a fish scale texture. In TinkerCad we took cylinders and tilted them. We then patterned these to create ridges to resemble fish scales. Our first few attempts at printing the models failed because the tilted cylinders didn’t have enough surface area so we added a base for them to print on. After 3D printing our first sample with ABS plastic we decided it would be best if we printed several different sizes of the same design to see which one felt the most like fish scales.

We then repeated the process to make the sand texture, however this time we modeled a bunch of spheres randomly placed around a plain. Once printed, we felt the models and determined that they were too rough and would not be pleasant for a child to touch. During our experimentation we found several different ways to smooth out the rough edges on the printed material. We chose four different methods of treatment: acetone vaporing, acetone bath, XTC, and plastic spray.
Acetone reacts with ABS plastic, melting away the rough edges. For the acetone vapor we heated up acetone in a crock pot designated just for this project. Then the tactile textures were suspended above the acetone pool in the vapor which reacted with the ABS plastic. It worked well except unpredictable bubbles would appear randomly on the textures. For the acetone baths we dipped the textures into a cup of acetone until they were smooth. This worked very well and was very consistent as it did not produce any random bubbles and it always smoothed out the textures the same amount.
The XTC was a plastic like coating that was painted over the textures. It smoothed out the rough edges by adding an extra, thick layer over the ABS plastic. The plastic spray came in a can and was designed to provide better grip when sprayed on a surface. When it was sprayed on the textures it eliminated the rough edges but left a grippy feeling which was not our goal.
After putting separate models of each size through the treatments we took the textures to the Anchor Center for Blind Children in Denver. A teacher and mother of a blind child provided us with input about her experience with teaching visually impaired children. She said they were good, but it is best for children to first feel the real thing before they feel representations of the object.

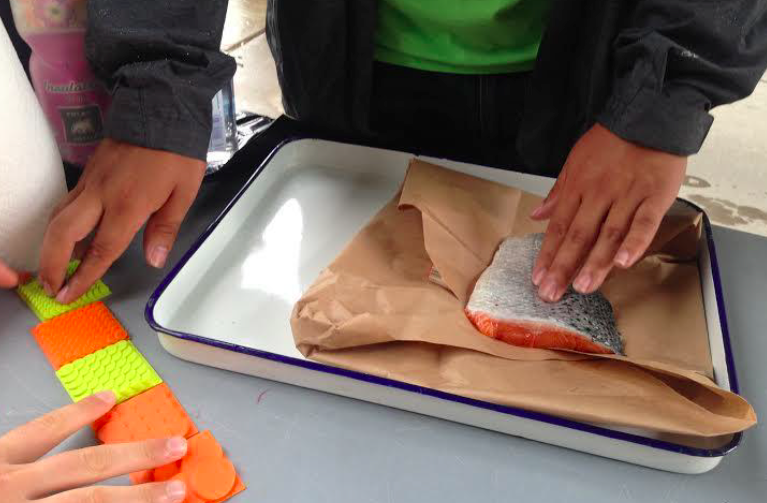
In turn, during our next round of testing we got a chunk of real fish from the supermarket for sighted volunteers to feel. With one hand they felt the real fish scales, and with the other hand they felt the modeled fish scales textures. The volunteers told us which size and treatment of the 3D printed representations felt the most like fish scales to them. With the sand texture they told us which one felt the most like sand paper.
At the end of our six week program we created a poster and presented our work at an expo with the other high school students from our program, and with high school students from other research programs running at the same time as ours. I learned that it is a lot more difficult and time consuming to create recognizable textures that are pleasing to the touch than I thought it would be. As a designer, I also learned that you can get so attached to your work that it can be difficult to listen to the advice of people more experienced than you. I enjoy working in a lab environment because you are able to come up with many more ideas and you can bounce your ideas off other people to see if they make sense.


Lindsey Welch is an All-Star!!! Centaurus Engineering loves her. Great job to Lindsey and her team. We are excited to see where all this work will lead.
LikeLike
This is outstanding research! I love seeing brilliant minds like Lindsey and Chantelle hard at work solving problems. What a great service to the visually impaired this will be. Keep up the great work!
LikeLike